

Managing billing
Change plans, adjust seats, buy Usage Credits, update the payment method, cancel or undo a cancellation, and download invoices from Settings → Billing.
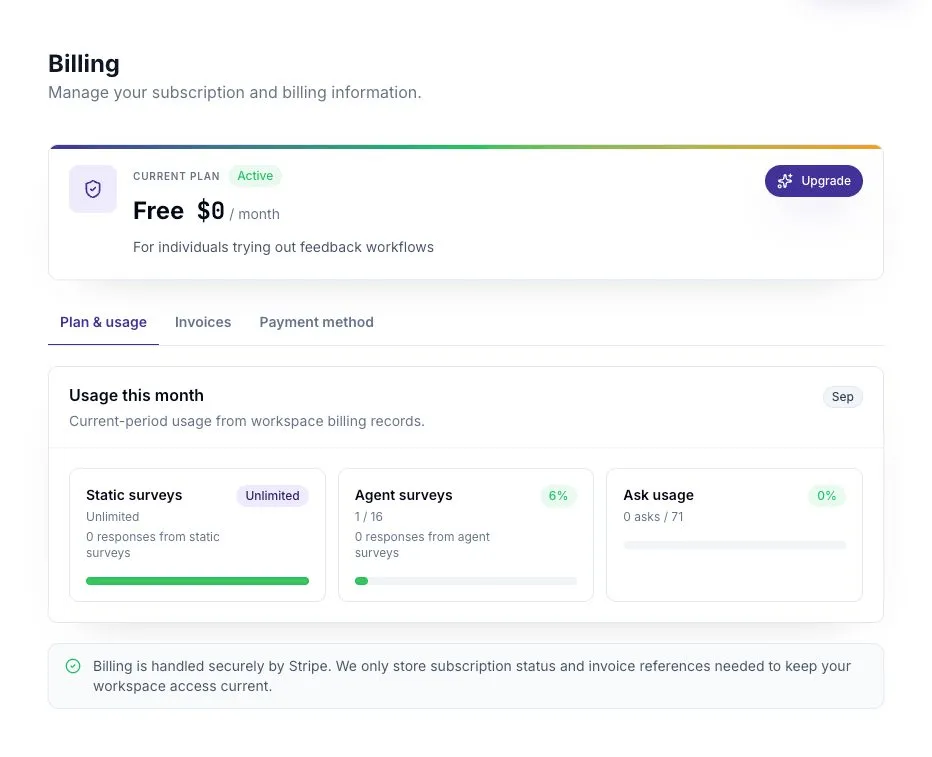
Everything billing-related happens in one place: Settings → Billing. It opens on a summary of the workspace’s tier, with three tabs beneath it — Plan & usage, Invoices, and Payment method.
Payments run through Stripe. Review the amount and effective date shown in the confirmation dialog before approving a change.
Change plan
Section titled “Change plan”- Select Upgrade (on Free) or Change plan from the summary at the top of the page.
- In the dialog, pick one of the four plan cards. Each shows its seat line and its headline capabilities.
- If the monthly / annual control is present, choose a cadence. It appears only when annual prices are configured for the environment.
- Select the review button — it names the plan and its price.
- Check the itemised charge in the review dialog, then confirm.
Before confirming, check what kind of change you are making:
- Choosing Enterprise does not open checkout. It starts a message to the ScatterSpoke sales address instead.
- Choosing Free from a paid plan is a cancellation, so it opens the cancel confirmation rather than a checkout. See Cancel paid access below.
- Downgrading between paid plans keeps your surveys and responses. The dialog says so before you confirm.
- Re-selecting your own plan on the other cadence is a real change, a subscription update — the button reads Switch to annual billing (or monthly), and Stripe prorates the unused time on the current period.
Change the number of seats
Section titled “Change the number of seats”The Seats card appears on the Plan & usage tab for Pro and Business workspaces.
- Use the seat stepper. It will not go below the plan’s minimum or above its maximum — see Seats and capacity for the per-tier bounds.
- A Review billing change prompt appears as soon as the count differs from what you currently pay for. Select it.
- Confirm in the review dialog.
Seat changes always stay on the cadence the subscription is already billed at, regardless of which cadence you were browsing in the plan dialog.
Buy Usage Credits
Section titled “Buy Usage Credits”The Add more usage section sits at the bottom of the same Seats card.
- Set a quantity on
Agent survey pack,Ask usage pack, or both. - Select Review billing change.
- Confirm.
You can adjust seats and buy credits in the same pass; they are charged together. Credits granted this way never expire and are only drawn on once the month’s included allowance is used up — see Usage Credits and the Ask Pool.
Apply a promotion code
Section titled “Apply a promotion code”Promotion codes are entered in the review dialog, and only for plan and seat changes — a purchase of Usage Credits on its own does not accept one.
- Open a plan or seat change and reach the review dialog.
- Enter the code and apply it.
- Watch the preview reprice. An accepted code updates the amount shown. If the code is rejected, correct or remove it before continuing.
Add or replace the payment method
Section titled “Add or replace the payment method”- Open the
Payment methodtab. - Select Add payment method, or Replace if one is already saved.
- Enter a card, or use Stripe Link.
A saved method shows its brand, last four digits, and expiry. You do not need a card on file to open a checkout — the review dialog can show a charge preview before you add a card, so you can see the exact amount before deciding.
Fix a failed payment
Section titled “Fix a failed payment”When a charge fails, a red Payment failed banner appears at the top of the Billing page.
- Select Update payment method in the banner.
- Save a working card or Stripe Link.
Paid access is not withdrawn the moment a payment fails — this is the window in which to fix it. If the subscription reaches an unpaid or canceled state, the workspace falls back to Free access.
Cancel paid access
Section titled “Cancel paid access”- On the
Plan & usagetab, scroll to the cancellation card at the bottom. - Select Cancel — or, on Enterprise, Request, which asks your account team to end the contract rather than cancelling immediately.
- Confirm in the dialog.
This schedules the cancellation; it does not end access on the spot. The plan stays active to the end of the paid period, after which the workspace moves to Free. Surveys, responses, and Seat Holders are preserved — paid-only capabilities become unavailable. Existing Seat Holders keep access to the remaining capabilities, while new invitations are blocked when the workspace is over capacity.
To undo it, select Keep … renewing in the amber banner that appears while a cancellation is scheduled. That works any time before the period ends.
Find and download invoices
Section titled “Find and download invoices”- Open the
Invoicestab. Recent invoices are listed with date, description, amount, and status. - Select View on any row for the full detail panel.
- Use the download control for the PDF.
A workspace that has never made a paid purchase has no invoices. A PDF may be briefly unavailable if Stripe has not generated it yet.
Add SSO to a Business plan
Section titled “Add SSO to a Business plan”SSO is the one capability bought outside the Billing page, because it is a recurring add-on rather than a tier.
- Go to Settings → SSO.
- On a Business workspace, select Add SSO to plan in the locked banner and confirm the charge.
- Configure SAML on the same page once the add-on is active.
To remove it later, use Remove in the SSO add-on card on that page. Enterprise workspaces have SSO without the add-on; Free and Pro cannot buy it and are prompted to upgrade instead. See Plans and tiers and SSO overview.