

Invite teammates and manage seats
Add a teammate to your workspace by email or invite link, choose their role, and check available seats.
To add a teammate, invite them as a Seat Holder when they need to create surveys, facilitate retros, or review feedback. People who only answer surveys do not need a seat.
- A Seat Holder can enter the workspace and use platform features. Seat Holders count against the workspace’s paid seat quantity.
- A Participant is tracked so they can answer surveys and feedback questions, with no workspace access. Participants never count against paid seats.
The same person can be both. You need permission to manage users and enough available seats before inviting someone new.
Invite by email
Section titled “Invite by email”- Go to Settings → Users.
- Select Invite Seat Holder.
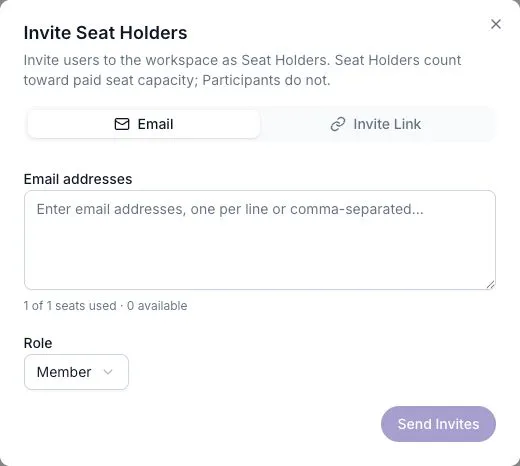
- On the Email tab, paste addresses — one per line, or comma-separated. The dialog counts the valid ones as you type.
- Pick a role: Member or Admin.
- Select Send Invites.
Under the address box you’ll see live seat accounting: “4 of 5 seats used, 1 reserved by pending invites · 0 available.” On Enterprise it reads “N seats used · Unlimited available.”
Email invitations are bound to the address they were sent to. Someone who receives a forwarded invite cannot accept it with a different account — they get an explicit mismatch error. Invitations expire after seven days.
Invite by link
Section titled “Invite by link”The Invite Link tab holds a single reusable link for the workspace, in the form /join/<token>.
People who complete the join flow receive Seat Holder access with the Member role, subject to available capacity — the link cannot grant Admin. It shows an Active or Disabled badge, and Regenerate issues a new token, which immediately invalidates the old one.
Teams have their own equivalent: the Add People dialog on a team has an Invite Link tab that adds people to the workspace and that team in one step. See Teams and groups.
How seats are counted
Section titled “How seats are counted”Three rules govern every path above.
Pending invitations reserve a seat. Available seats are capacity − Seat Holders − pending invitations. A seat sent but not yet accepted is already spoken for.
Capacity is checked when you send and when the invitation is accepted. Sending validates the batch up front, but a later downgrade or capacity change can still block acceptance. If an invitee cannot join, check the workspace’s current capacity before resending.
Inviting an existing Seat Holder is free. Addresses that already hold a seat are skipped in the arithmetic. Re-inviting an address that already has a pending invitation is also seat-neutral: the old invitation is revoked and replaced.
The result summary distinguishes these outcomes — “3 invited, 1 already members, 1 added to team.”
Converting a Participant to a Seat Holder
Section titled “Converting a Participant to a Seat Holder”Someone who has only ever answered a survey exists in your workspace as a Participant. They do not use a seat. Inviting them — by email or by link — performs a Seat Conversion: their existing relationship is updated in place so that they are now both a Participant and a Seat Holder.
Two consequences follow:
- Conversion is explicit and it costs a seat. It never happens automatically because someone answered a survey. It requires available Seat Capacity at the moment of conversion, or a billing change that increases capacity first.
- Their Participant history is not replaced. They keep the same identity, so responses they submitted before they had workspace access are still theirs.
When the workspace is full
Section titled “When the workspace is full”If there aren’t enough seats, the invite fails with a message naming the shortfall — “Not enough seats available: 3 needed, 1 available” — or, on Free, “Your Free plan includes 1 seat.” The dialog links straight to Billing.
Seat rules per plan:
| Plan | Seats |
|---|---|
| Free | 1 |
| Pro | 1–5 |
| Business | 5 included, up to 250 |
| Enterprise | Unlimited |
Existing Seat Holders keep working when a workspace ends up with more Seat Holders than its capacity — after a downgrade, say. What stops is adding or converting anyone new. See Seats and capacity.
Change someone’s role
Section titled “Change someone’s role”From Settings → Users, use the row menu to Make Admin or Remove Admin, or open a person’s detail page and pick from the full role list. See Roles and permissions for what each role can do.
Two guardrails apply: you cannot change your own role, and you cannot change the workspace owner’s role through this menu. Other administrators can have their roles changed by someone with the required permission.
Remove someone
Section titled “Remove someone”Open the person from Settings → Users and select Remove from Organization, or use Remove User from the row menu.
Removal archives their workspace relationship — they lose access to every team and all data, and the seat is released. You cannot remove yourself or the workspace owner through this flow. Other administrators can be removed by someone with the required permission.